** DISCLAIMER ** The items that have been reimagined are old, but they aren’t highly valuable or the last of their kind. They are second hand items I have given a new life to and have put my own stamp on. If you find altering old religious items or antiques offensive this isn’t the blog post for you.

If you have followed me for awhile you probably know that making art with my hands is an act of self-care for me. So this long weekend I spent time creating with my hands and it was amazing!
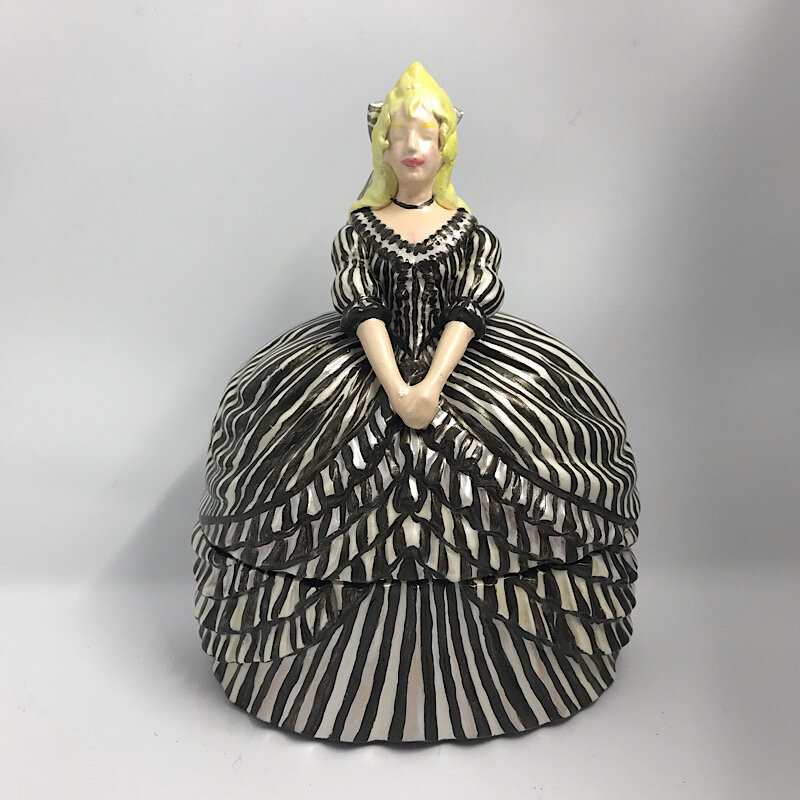
Sleepy Hollow Trinket Box
I decided to remake a trinket box to hold my vintage mourning jewelry. This project was inspired by Rachel Maksy. She took a vintage figurine and repainted it to resemble Katrina Van Tassel from Sleepy Hollow with the iconic striped dress. That last scene where Ichabod Crane, Katrina Van Tassel, and young Johnathan Masbeth live happily ever after in New York City—I was as in love with that dress as the happy ending. I thought that idea could be easily recreated for a lady trinket box and I might even be able to find a spooky tree style jewelry holder that also pays homage to the movie to go with it.

I found a vintage trinket box at an antique store that I thought would work perfectly. She had some damage and you could see her head had come off and had been reattached. But I found her to be perfect for this project!


I knew I wanted to modify her a bit and give her longer hair, a couple of curls near her face, and give her the hair bow from the last scene in the film. I wasn’t too worried about that hair peek on the figurine but I did want to add the additions.

I used nail files to rough up the figurine for painting and adding sculpted additions (I couldn’t find my sand paper of course), I used Miliput for the added hair and bow, and did most of the sculpting with my hand and only used a sculpting tool a tiny bit on the bow. The best trick I found with Milliput is to use water to smooth it out.

I used acrylic paint to repainted her. I used shimmer paint to keep it feeling like the original. It took at least three coats of paint to get the gold accents covered. The paint stuck to the Milliput much better than the figurine, even after being sanded to help the paint stay put.

I did the sculpting the day before I painted to give it adequate time to harden. I then spent most of the day working on the new paint job. This probably took me 10+ hours to complete (I feel that is important to say because we so often disregard how much time creating art actually takes), and once finished I sprayed the figurine with clear varnish to seal it.
I am really happy with the final product! I think she is amazing! And she has some secrets... if you are a fan of the movie you will understand the book and purple chalk I put inside and the bottom symbol.


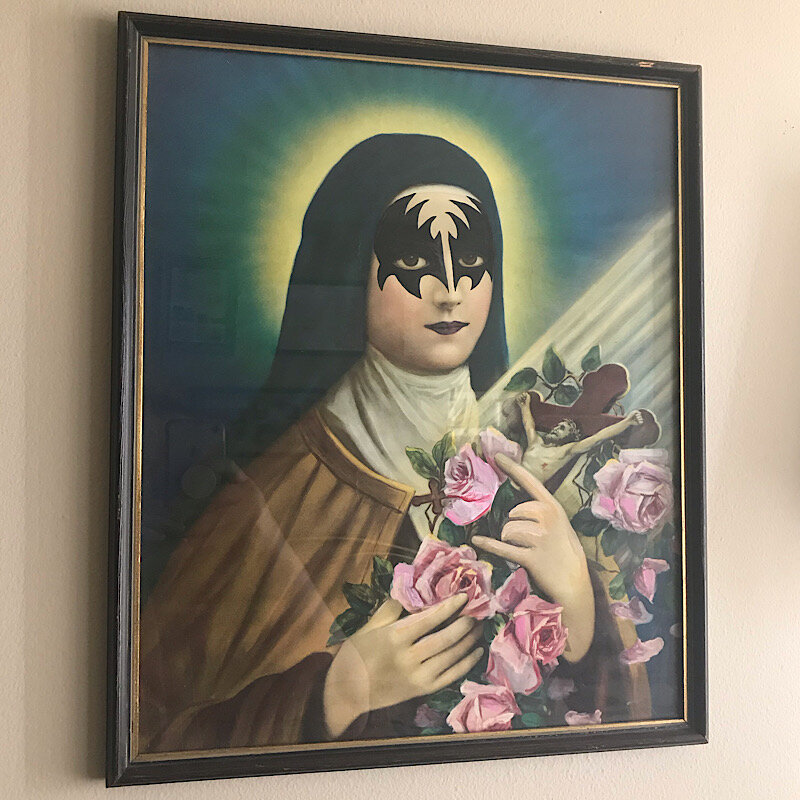
Religious Painting Remix
One of the easiest ways to flip an item is to find old artwork at the thrift store and paint it to give it an unexpected element. I found this vintage print for only $2.99 and when I saw her I instantly knew I wanted to give her KISS makeup.

I first took tracing paper and made multiple sketches of the Gene Simmons mask design on her till I was happy with how it laid out. I then cut out the tracing paper to use as a pattern and traced on the design.


I could tell I was futzing with the design too much so I turned the painting upside down to work on it. This is a great trick for artists or anyone who overworks pieces, it helps your brain see it differently.

And goodness I am so happy with how this turned out!!! My favorite little addition is her hand. Pro tip: when you are altering a large area like her hand and the roses and you can’t get the paint to exactly match, be sure to paint other areas with those colors so that it looks more seamless in the end.

Mixed Media Wooden Cut-Out
The next item I did a while back, but I want to showcase it because I used a bunch of mediums. This started as a very beat up wooden cut out from an antique store. It was shabby chic and probably was in an outside nativity years ago. I decided to make her my own and try a bunch of different techniques on her to make her pop.
I started off painting her with some bright metallic acrylic paints. She almost felt tie-dyed at the end.

I then added vintage images (some over 100 years old). These were just cut out and applied using Mod Podge. I also tried a more advanced technique with the Mod Podge. I did an image transfer technique. I used only book illustrations I didn’t want to ruin and I made photo copies of them. I then took the photo copies and applied three layers of Mod Podge on them. I then stuck the images face down on the piece with more Mod Podge. After that all dried I took water and started to rub away the paper leaving the transfer image. I had never done this technique before and it worked really well!

The final work turned out so great! I just love all the details on this! She is one of my favorite pieces I own now.


I hope this inspires you to possibly remake something for your home. You can find a vintage item at a thrift store or an inexpensive antique store and give it a new life. The limit is only your imagination!